Walkthrough and Tutorial
Hurricane Landing is a computer game that teaches its players about community planning through experiential learning. It is set in a city located on a small barrier island somewhere along the Gulf Coast. The game is designed for four players who are connected to one another via the Internet.
This document will teach you how to navigate the game's interface and the basics of how to play.
Player Roles
Before the game begins, each player is assigned one of four roles: hotel manager, local resident, local shopkeeper, or vacation resident. Throughout the game, each player's job is to represent the interests of his or her respective citizenry in the small city while participating in collective decisions about how to improve the city.
Game Overview
There are three rounds in the game. Each round represents a particular event in the city's history. Several years pass between rounds. Each round begins with a briefing that explains the scenario for that round, the problems the players face, and the resources they have available. The round ends when all the proposals have been voted on, or when the players run out of budget.
The basic gameplay consists of understanding the city's current situation and available options for future change, submitting proposals for consideration by other players, negotiating with other players to find acceptable compromises, and resolving the proposals by vote.
Setting Up the Game
See the startup page.
This walkthrough was created using a game with 1 human player and 3 robots.Getting Started
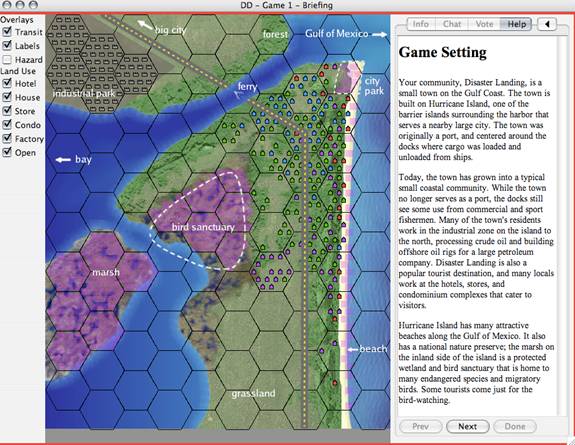
This screen explaining the Game Setting is the first thing
that you will see when the game opens up. Here, you will get
information about the fictional town where the game takes place.
Click
 to continue to
descriptions of the Player Roles. There are four player roles:
hotel manager, local resident of the town, local business owner, and
vacation resident of the town. You will be playing the game from
the viewpoint of your chosen role. Pay close attention to the
description of your role so that you can really get into it during the
game. Click
again to read about the Round 1 Scenario. This will give you
an idea about your community's current situation. Finally, click
to continue to
descriptions of the Player Roles. There are four player roles:
hotel manager, local resident of the town, local business owner, and
vacation resident of the town. You will be playing the game from
the viewpoint of your chosen role. Pay close attention to the
description of your role so that you can really get into it during the
game. Click
again to read about the Round 1 Scenario. This will give you
an idea about your community's current situation. Finally, click  to begin the first
round. The game display will appear once all of the players are
ready.
to begin the first
round. The game display will appear once all of the players are
ready.
The Display
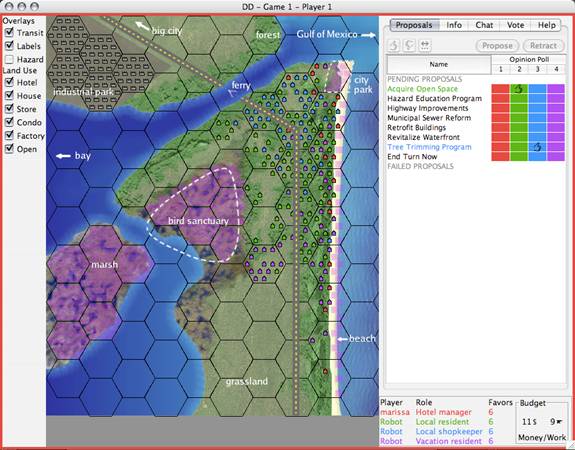
The left-hand side of the screen shows a map of Hurricane Island
and its surrounding area, and the right-hand side of the screen shows
the control panel for the gameplay. You are currently under the  tab. This screen
shows a list of the proposals on the left which can be put on the
table for a vote during this round.
tab. This screen
shows a list of the proposals on the left which can be put on the
table for a vote during this round.
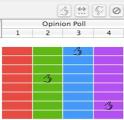
Opinion Poll
On the right is the  , with the colors
corresponding to the player colors shown at the bottom of the
screen.
, with the colors
corresponding to the player colors shown at the bottom of the
screen.
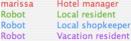
The gives the other players a quick
overview of your opinions, which helps with debates and negotiations.
You can show your opinion about any of the
 by highlighting the proposal and then
clicking the
by highlighting the proposal and then
clicking the  or
or  button.
If you want to support one of the
conditionally, click on the  button and
type in your conditions. Your fellow players will see your condition
when they hold their mouse over the
button and
type in your conditions. Your fellow players will see your condition
when they hold their mouse over the  mark that shows up in the opinion poll. You can change your opinion at
any time or withdraw it completely with the
mark that shows up in the opinion poll. You can change your opinion at
any time or withdraw it completely with the  button.
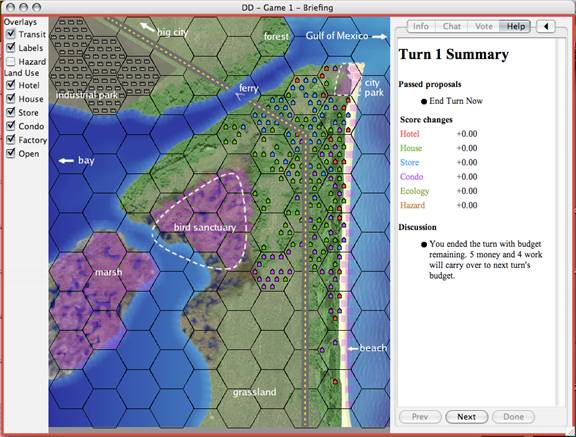
Map
The map located to the left of the display shows a bird's-eye view of the city. The blue areas on the map represent water, while the greens and browns are land. The map is divided up into hexagons; each hexagon is about a mile across.
There are a number of different pieces of information that can be displayed on the map. Notice that you can select different layers to visualize on the map by checking different boxes under the Overlays section to the left of the map. To show or hide a layer, click the checkbox next to its name, and it will change what you see on the map. The following table details what the map images represent:
| Overlays | Key |
|---|---|
 |
Major roads and transportation features |
 |
Descriptive labels about features shown on the map |
 |
Water hazard (Red = high, orange = medium, yellow = low) |
| Land Use | |
 |
Large hotels and other tourism-related enterprises (red) |
 |
Individual homes and housing for permanent residents (green) |
 |
Shops and other commercial buildings (blue) |
 |
Condominiums, luxury homes, and other vacation housing (purple) |
 |
Factories and other industrial activities (gray) |
 |
Protected and or undeveloped land (magenta) |
Keep in mind that the house-shaped icons displayed on the map
represent multiple buildings, not individual structures. For example,
if half of the icons in a hexagon are blue, it means that roughly half
of the total acreage of the area is being utilized by shops, shopping
centers, and other commercial buildings. 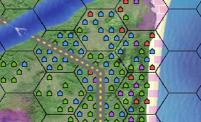
Gameplay
Gathering information
If you click on any of the proposals, information about what that
proposal entails will appear on the screen. As an example, click on
the  , and this box will appear on the
screen:
, and this box will appear on the
screen:
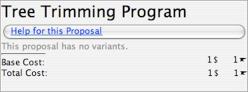
The little anvil (  ) represents units
of work. Notice that the Total Cost of the proposal is listed
as
) represents units
of work. Notice that the Total Cost of the proposal is listed
as  , which means that the
proposal costs one unit of money and one unit of work. You can
compare these numbers with your current Budget, which is shown
at the bottom right-hand corner of the screen. At the start of Round
1, your budget is
, which means that the
proposal costs one unit of money and one unit of work. You can
compare these numbers with your current Budget, which is shown
at the bottom right-hand corner of the screen. At the start of Round
1, your budget is  , so passing this
proposal would leave you with
, so passing this
proposal would leave you with  .
.
Click on  for more information about
the Tree Trimming Program. This will put you under the
for more information about
the Tree Trimming Program. This will put you under the  tab, which also contains all of the scenario
information. Click on the
tab, which also contains all of the scenario
information. Click on the  tab to get
back to where we just were.
tab to get
back to where we just were.
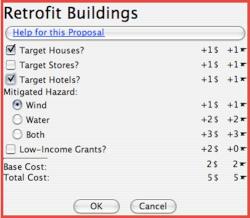
Making proposals
Let's say you want to propose the initiative to Retrofit
Buildings. Highlight  and click on
the
and click on
the  button. Keep in mind that each
player can only propose each pending proposal one time. Then check
the boxes next to your desired options listed for the proposal (not
all proposals have different options) and click
button. Keep in mind that each
player can only propose each pending proposal one time. Then check
the boxes next to your desired options listed for the proposal (not
all proposals have different options) and click  .
.
The proposal is then listed under  in
your player color.
in
your player color.
If a proposal doesn't have any options to configure (for example
the Tree Trimming Program) you don't have to click  ; just click on the button.
Negotiating
You could call for a vote now, but you might want to build support for it first. You can negotiate proposals by chatting with the other players or by making statements of conditional support.
When one of the other players types a message, it automatically
lights up the  tab on your screen. To
respond, click on the tab
and you will see this:
tab on your screen. To
respond, click on the tab
and you will see this:
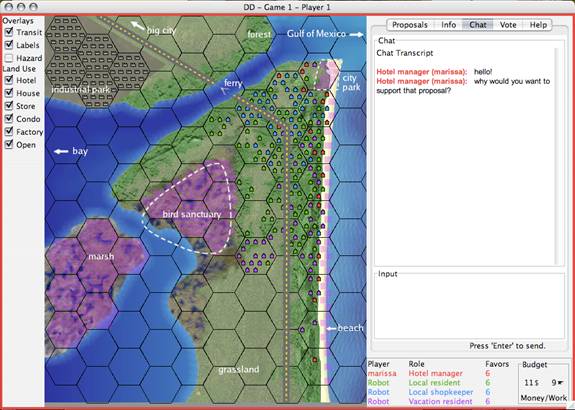
You can type your responses by clicking in the space under the Input label. Try to get into the role you are playing in the game. What would someone with your role think about the proposal that is being discussed?
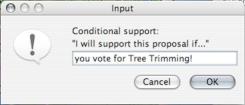
Now let's try expressing conditional support. This was
introduced in the fourth section of this walkthrough, entitled The
Display. Someone else has proposed the initiative to
Acquire Open Space, but you are trying to make sure the
Tree Trimming Program passes. Here, you might use a statement
of conditional support to help your agenda. Simply click on the  button and type in your conditions. For
example:
button and type in your conditions. For
example:
If you change your mind about a proposal you made, you can always
retract the proposal before it goes to vote. To do this, highlight
the proposal and then click on the  button. Keep in mind that you can only retract a proposal if you were
the one who proposed it.
button. Keep in mind that you can only retract a proposal if you were
the one who proposed it.
You can also  a proposed initiative
if you were the one who proposed it. Highlight the proposal, then
click and make your selections. This
option is useful if you have negotiated different options for a given
proposal.
a proposed initiative
if you were the one who proposed it. Highlight the proposal, then
click and make your selections. This
option is useful if you have negotiated different options for a given
proposal.
Voting
When you think its time to vote, go to the  tab, where each of the proposals on the
table are listed.
tab, where each of the proposals on the
table are listed.
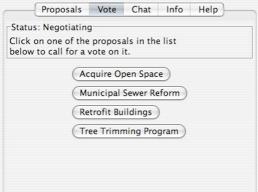
You can click on any of the proposals on the list to start a vote
on it. Let's vote on the  .
.
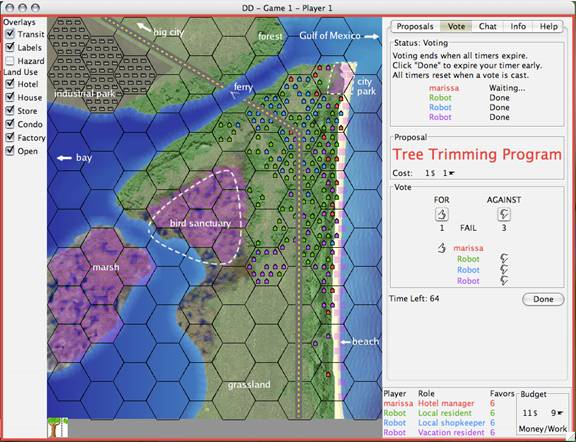
You can cast your vote by clicking on either  or
or  .
.
You can cast one vote each time a vote is called, but you can also get extra votes by using favors. You can vote more than once, but each time you do, you will use up one of your favors. One vote equals one favor, and you only have six favors for each round.
Notice that a timer begins counting down when a vote is
called. You get 120 seconds to cast your vote; otherwise the proposal
will either pass or fail without you. Each time a player votes, the
timer resets to 120 seconds. You can use this time to negotiate. If
you're satisfied with the outcome and don't need to negotiate any
further, click  to expire the timer
early.
to expire the timer
early.
Vote Outcomes
It may take a few moments for the game to finish applying the
effects of the passed proposal to the scenario. After a vote takes
place, the game automatically switches to the  tab to show you how the island is changing
as a result of your decisions.
tab to show you how the island is changing
as a result of your decisions.
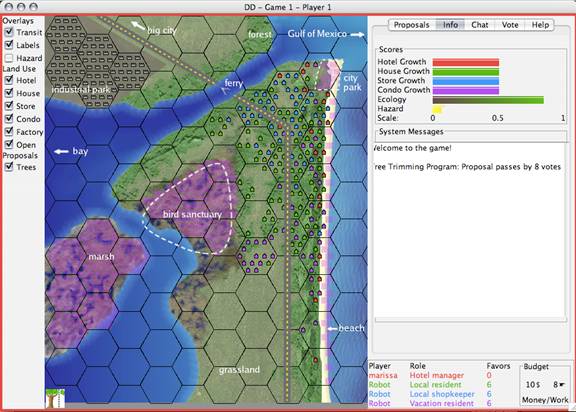
The colorful bars at the top of the display show different measures of your city's condition and allow for you to gauge how the island's real estate, economy, ecology, and hazards are changing as a result of the new initiatives. Do you like what's happening? How would the person with your role view things? Try and ask yourself these questions as you go along.
Notice that your Budget has decreased, the Map is
showing the new proposal, and that the  section of the screen is logging important information about the main
activities that have taken place. Refer to the System Messages
at any time if you are confused about what has happened.
section of the screen is logging important information about the main
activities that have taken place. Refer to the System Messages
at any time if you are confused about what has happened.
If a proposal gets voted down, it will still be listed on the  page, and will now also be listed under the
 section. Even though the proposal
failed once, it doesn't mean that it can't be voted on again.
However, someone else has to propose it since each player can only
propose something once.
section. Even though the proposal
failed once, it doesn't mean that it can't be voted on again.
However, someone else has to propose it since each player can only
propose something once.
If there is a tie, the proposal is tabled and can be voted on again when/if someone else decides to propose it.
Game Rounds
When does the round end?
The round ends when there is not enough work or money remaining in the Budget for any of the proposals to be passed.
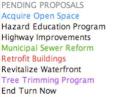
Notice that there is also an option to End Round Now under
. You can vote on ending the round just
like any other proposal- if the proposal to end the round passes, the
round ends.
What happens at the end of a round?
Let's walk through what happens when Round 1 ends. When the round is over, a screen comes up labeled Round 1 Summary, which details the Passed Proposals and Growth that took place during the round that was just played.
Click  , and you will see a new screen
entitled Development, which shows the Growth that has
taken place over the past few years. Remember, several years pass
between each round. Click again and
another informational screen will come up, explaining what takes place
on the island following Round 1. Click and you will be shown the Round 2
Scenario and a list of the Problems the island is now being faced
with. Click , and you will be shown a
list of the Round 2 Proposals. Then click to begin the second round.
, and you will see a new screen
entitled Development, which shows the Growth that has
taken place over the past few years. Remember, several years pass
between each round. Click again and
another informational screen will come up, explaining what takes place
on the island following Round 1. Click and you will be shown the Round 2
Scenario and a list of the Problems the island is now being faced
with. Click , and you will be shown a
list of the Round 2 Proposals. Then click to begin the second round.
You will be taken through similar screens after the second round. Keep in mind that there are a total of three rounds in the game and that at the beginning of each round you are given a new budget which is shared among the players and half of any leftover budget from the previous round(s).
What happens at the end of Round 3?
Round 3 will come to an end in the same way as the first two rounds, and you will see how the community has changed as a result of the initiatives passed in the third round. You will then be able to review the flow of events that occurred throughout the entire game, including the decisions you made in each of the three rounds, the problems that arose, and the resolutions of those problems. A discussion should follow. Enjoy!